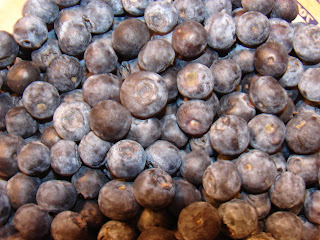
Fred Meyers had blueberries on sale in the middle of January and this is one of my favorite coffeecakes to make. The buckle weighs a ton because of all 4 cups of fresh blueberries. The streusel is a perfect addition for added sweetness and brown sugar flavor and the cream cheese whipped cream is not overly sweet but adds another great creamy texture and flavor that pulls everything together and makes the breakfast coffeecake a WoW! dish. I was running around the house this morning trying to figure out where I thought I put the recipe for safe keeping. It was horrible! I hate that I do that. . .you know, think that you'll never forget where you put something, only to forget 2 days later. I am now putting this recipe into the computer so that I will always have it at my fingertips. . .except that this blog does not keep titles next to dates, so I'll have to figure out how I am going to remember that today I posted this recipe. This sounds so silly but I have so many recipes cataloged to try now, try later, for such-and-such holiday or event, for entertaining, for my daughter because it is basic, etc. Tried and True has a file already but the file is loaded. I have a 3-ring binder that is full so I put the recipe inside of, what was then, my favorite cookbook. My tastes have changed I guess. So here is my super moist and yummy blueberry buckle:
 Streusel:
1/2 c. all-purpose flour
1/2 c. packed light brown sugar
2 T. granulated sugar
1/4 t. ground cinnamon
Pinch table salt
4 T. unsalted butter (1/2 stick), cut into 8 pieces, softened but still cool
Cake:
1 1/2 c. all-purpose flour
1 1/2 t. Baking Powder
10 T. unsalted butter (1 1/4 sticks), softened but still cool
2/3 c. granulated sugar
1/2 t. table salt
1/2 t. grated lemon zest
1 1/2 t. vanilla extract
2 large eggs, room temperature
4 c. fresh blueberries
Cream Cheese Whipped Cream:
4 ounces cream cheese, room temperature
1/3 c. confectioners' sugar
pinch table salt
1/2 t. vanilla extract
1 c. heavy cream
Directions:
1. For streusel: In standing mixer fitted with flat beater, combine flour, sugars, cinnamon, and salt on low speed until well combined and no large brown sugar lumps remain, about 45 seconds. Add butter and mix on low until mixture resembles wet sand and no large butter pieces remain, about 2 1/2 minutes. Transfer streusel to small bowl and set aside.
2. For the cake: Adjust oven rack to lower-middle position; heat oven to 350 degrees F. Spray 9-inch round cake pan with 2-inch sides with nonstick cooking spray, line bottom with parchment or waxed paper round, and spray round; dust pan with flour and knockout excess.
3. Whisk flour and baking powder in small bowl to combine; set aside. In standing mixer fitted with flat beater, cream butter, sugar, salt, and lemon zest at medium-high speed until light and fluffy, about 3 minutes; using rubber spatula, scrape down bowl. Beat in vanilla until combined, about 30 seconds. With mixer running at medium speed, add eggs one at a time; beat until partially incorporated, then scrape down bowl and continue to beat until fully incorporated (mixture will appear broken). With mixer running on low speed, gradually add flour mixture; beat until flour is almost fully incorporated, about 20 seconds. Disengage bowl from mixer; stir batter with rubber spatula, scraping bottom and sides of bowl, until no flour pockets remain and batter is homogenous; batter will be very heavy and thick. Using rubber spatula, gently fold in blueberries until evenly distributed.
4. Transfer batter to prepared pan; with rubber spatula, using a pushing motion, spread batter evenly to pan edges and smooth surface. Squeeze handful of streusel in hand to form large cohesive clump; break up clump with fingers and sprinkle streusel evenly over batter. Repeat with remaining streusel. Bake until deep golden brown and toothpick or wooden skewer inserted into center of cake comes out clean, about 55 minutes. Cool on wire rack 15 to 20 minutes (cake will fall slightly as it cools).
5. Run paring knife around sides of cake to loosen, Place upside-down plate (do not use plate or platter on which you plan to serve the cake) on top of cake pan; invert cake to remove from pan, lift off cake pan, then peel off and discard parchment. Re-invert cake onto serving platter. Cool until just warm or to room temperature, at least 1 hour. Cut into wedges and serve with Cream Cheese Whipped Cream with directions stated below. . .
DIRECTIONS FOR CREAM CHEESE WHIPPED CREAM:
In bowl of standing mixer fitted with whisk attachment, whisk cream cheese, confectioners' sugar, and salt at medium-high speed until light and fluffy, 1-2 minutes, scraping down bowl with rubber spatula as needed. Add vanilla and beat at medium speed until combined, about 30 seconds; scrape down bowl. With machine running at low speed, add heavy cream in slow steady stream; when almost fully combined, increase speed to medium-high and beat until mixture holds soft peaks when whisk is lifted, another 1-2 minutes, scraping down bowl as needed. Serve with blueberry buckle.
 Corn and Crab Chowder

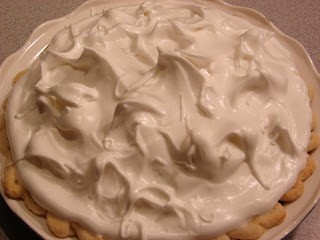
 Jen from Canada posted our challenge for January of a beautiful lemon meringue pie. This dessert brings one word to mind: nostalgia, and I would love to thank her for the warm memories that go with making this pie. My father loved lemon meringue pie and my Mom loved chocolate meringue pie. As a child, whenever I wanted to bake something special for my parents, I would make both of these pies, one for each so that neither parent was left out. Of course, Mom and Dad shared with all 4 of us children but the pies were created because I knew how much our parents would enjoy it. Then I grew up and moved from home. Every year after, I would make at least one lemon meringue pie for Dad. This was a four hour drive to get to my parents, then make and bake the pie at their house. Dad always acted so surprised and appreciative! I would like to include in this that my Mom is no slouch as a baker. She can outbake me any day, any time. She just doesn't enjoy baking pies. Anyways, Mom and Dad moved to Yuma, AZ about 3 1/2 years ago and since I live in WA state, there is no more driving to my parents to bake anymore pies. This is terrible. I am crying and typing. They are happy tears and homesick tears, so it is okay. =) When I was making the lemon filling, the phone rang. It was my Mom and Dad was in the background. Laughter and memories were shared over the phone while I scooped lemon filling into the pie crust. Dad wanted me to send him a slice in the mail. . .hhhmmm, this could be a problem.


 I am working on dinner menus again. I try to keep organized and get menus for the week but then I come across a recipe that just jumps out at me. This time I was reading Bon Appetit, the January issue of this year, and there is a recipe for breaded skinless fish fillets (I am using a petrale sole) with red pepper mayonnaise. Thin fillets with a last coating of crustless French bread crumbs. The whole coating tastes light and with the fillets being sauteed quickly, I have a tender, flaky texture with LOTS of flavor without the greasiness of fried fish. I just have to add this fish recipe to my regular dishes. I also love rice but I needed something that added a little extra flavor to go with the medium punch delivered by the Red Pepper Mayonnaise so a nice red rice dish combining fresh tomatoes, onion, chili powder and diced red peppers was going to be my easy side dish. The whole dinner took less then 35 minutes to cook and I had a healthy meal on the table.
 The soup is simple yet has all the flavors of a fully topped baked potato. The soup is put together in half the time that it would take to actually bake a potato in the oven and you get to use a spoon so the title of this lovely family favorite. . .named by my Mom. . .is:

 Transfer 2 cups cooked potatoes to bowl. Puree remaining soup in batches in blender until smooth. Return to pot and warm over medium-high heat. Off heat, stir in cheese until melted, then whisk in sour cream, Return reserved potatoes to pot and season soup with pepper. Ladle soup into bowls, garnish with bacon, fried potato skins, scallions, and sour cream.
 Making breakfast always feels like a rush. I think that is why I struggle with it so much. People tend to sleep in on the weekends and I never know when to start because no one wants to eat when their tummy isn't awake yet, so timing usually goes out the window and I always feel that I am making brunch instead of lunch.


 I had a LOT of fun making these cut little breakfast pizzas. I found the recipe in the New Bon Appetit magazine and since I am always looking for new ideas on the ol breakfast theme, I thought I would give it a try. Sunny side up eggs were easy to take out of the pan because you let them sit in the pan for a couple of minutes while the pizzas bake. The whole recipe was easy and the end result was fun to eat. I found that picking this contraption up with my fingers was easier to eat then using a knife and fork because Ciabatta bread toasted is a little harder to cut without making a mess out of the egg. Try it and you'll see. I'm terrible in that I love food that I can eat with my fingers. Sushi would be better to me if it were polite to use my fingers because the little molded rice bundles with toppings look perfect for fingers. I don't know if you have guessed by now but chopsticks are still a work in progress! The last time I went to a Japanese restaurant, the room was packed full of people and the group I was with were all seated at a large round table situated in the middle of the restaurant. Food was ordered for me by friends from Japan and, of course, I am all excited and nervous. . .uhmmm, no forks present. Just chopsticks. It's okay, I have the basics down. Food is served and would you believe that it seemed like all the food looked slippery? Yep, first bite I tried to take, the slippery little bugger flew out of my chopsticks and landed several tables away! I didn't know you could feel your face turn each shade of red and for that long! Of course, now everyone is giving me chopstick lessons. . .after they caught their breath from laughing. I have practiced at home since then and I am not overly excited to try these skills anytime soon at another restaurant. Yeesh!
 P.S. . .I cut this recipe in half because there were not 8 people present. Easy to do!
 My picture is dark and I am still working on trying to figure out which mode to have the digital camera set at. This is driving me crazy because I keep trying different ones and then I forget which one I did and did not use. If I would just stick to one and take pictures, download the grumble, grumble, snort, pictures, run back upstairs and take some more pictures with a different setting and do the same process again. . .only with louder grumbling, until I can figure out which is the best setting. . .then I just may get excited about taking pictures! Right now, frustration. . .that is it in a nutshell. Some of my pictures turn out great. . .a very *few* of them and when they do I get all excited, till I once again remember that I have NO IDEA what setting I was on at the time. . .because, of course, I changed the setting.
 I strained the seeds from the pulp to make a nice puree and the aroma was almost citrus and floral. I absolutely LOVED it and I can't wait to try this again. My downfall to making this recipe was the fact that I used regular sweetened coconut because I did not have any unsweetened, medium shredded coconut on hand. This tart had a flakey and butter tasting crust that was phenomenal and the filling had just the right touch of lime juice and peel to go with the coconut cream and the shredded coconut. Oh, of course, there is the addition of rich cream and eggs. What I appreciated was the fact that even though I used sweetened, shredded coconut, the tart still wasn't overly sweet. I fell in love with the flavor on the first bite and everyone that tried it agreed. . . and I am the only coconut appreciater!

 I can not believe that I canned my brains out towards the end of this last summer and have totally forgotten all about using any of my hard-earned gems! What the Heck? Well, I opened a quart jar of my canned Italian Stewed Tomatoes for this dish and Boy, was I happy with the flavor and aroma! If I ever needed a nudge to jump back into the canning world in the near future, this was it. Just opening the jar and having all that aroma wafting out was intoxicating and a renewed, proud moment was enjoyed. I felt none of the aches and pains of standing on my feet for hours at a time, trying to get hundreds of pounds of produce canned because I have no self-control when it comes to fresh food and trying something new! I come from a long line of family members that view new experiences as all or nothing! My Grandma tackled sewing and started making pillows first. Well she went from one color of fabric to marching right back to the craft store and purchasing every shade of this fabric (all 10 of them) just so that she could go home and make these pillows, with a small checker print, cross stitch threaded x's in cream colored, heavy thread and then proceed to sell them. How she found people to sell them to, I have no idea! Grandma and Grandpa were never hurting for money by any means. She just always had to be making a profit. The sewing projects escalated from there. Then there is Dad! He wanted to learn fine wood working. He taught himself how to make the most beautiful wood boxes that all came together by tongue and groove and any holes were filled from the sawdust sanded from the wood prior. This sawdust was mixed with a little wood glue and the slight wood imperfections were filled. The Cherry and/or Maple wood boxes were about 18 inches wide, 10 inches across and 4 inches deep. The inside of these beautiful, smooth, perfect boxes were coated with crushed velvet. The clasp on the front was small, delicate and gold. My father perfected the one and continued making them until he was burned out. I can remember as many as a dozen. These boxes took hours of patience and care. He then went on to bigger and better fine wood working projects. A lot of fond childhood memories!


 I thought I was going to be good and just cook dinner and look through my new Bon Appetit Magazine that came in the mail. I also am starting to plan what flower seeds I need to start right now. Then there is the flower box outside of my kitchen window that I have always been wanting to incorporate herbs with flowers so that when I want to season something, well, I would be able to just open my window and clip what I needed with the kitchen sink ever so conveniently located directly underneath the window. I think it would be perfect! For some reason, this is still on my to do list. . .but with all this set to the side burner my issue was with dinner tonight. . .and feeling a little deflated =.


 So, I pulled out my pizza stone. Never have I used a bread or pizza stone before in my life NOR have I seen someone else use one in their oven. The whole experience was new and exciting! I used a roasted pepper and five cheese chicken sausage for the meat of the filling and Deborah was so right about the Calzones turning out perfect the first time. The crust *was* crunchy and chewy and the filling was creamy with the Ricotta cheese, Parmesan cheese and Mozarella cheese wrapped around seasoned sausage. I rolled by little dough balls into 9-inch circles and rested them on their parchment paper beds. I spread the filling in the middle and learned how to seal the edges of the dough by wrapping the edge over my index fingertip. When they were ready to go into the oven, I almost felt sad to bake them because I felt so proud of my accomplishment. When they did come out of the oven, off of my now broken in pizza stone, the Calzones were a beautiful golden brown color with the prettiest edging. The Kosher salt was glistening from the lights shining down on the Calzones and they were almost to pretty to eat. . .almost. =D


